photo 1-1.jpg photo 2-1.jpg photo 1-new.jpg photo 2-wear.jpg photo 3-insp.jpg photo 4-meet.jpg photo 5-contact.jpg photo 6-adv.jpg photo 2-2.jpg photo 3-1.jpg
Showing posts with label handmadeholidays. Show all posts

Friday, December 16, 2011

New Year Cupcakes


Champagne Sparkle Hi Hat Cupcakes


  • For The Cupcakes:

    Simply use your favorite white or yellow cupcakes cake recipe or boxed cake mix and add 1/2 teaspoon champagne extract.

     It Can Be Purchased {Here}


    For The Frosting

    • 1 3/4 cups sugar
    • 1/4 cup of water
    • 3 large egg whites
    • 1/4 teaspoon cream of tartar
    • 1 teaspoon vanilla extract
    • 1/2 teaspoon champagne extract
    • 1 bottle of Wilton Pearl Dust. (purchase {here} or at any craft store.)
    • a paint brush
  • For The White Chocolate Coating

    • 2 cups chopped (about 12 ounces)  white chocolate
    • 3 tablespoons canola or vegetable oil

    • Prepare the frosting: In a large heatproof bowl, combine sugar, 1/4 cup water, egg
 whites, and cream of tartar. Using a handheld electric mixer, beat on high speed until
 foamy, about 1 minute. Set bowl over a pan of barely simmering water. Beat on high
 speed until frosting forms stiff peaks, about 12 minutes; frosting should register 160
 degrees.on a candy thermometer. Remove from heat; stir in vanilla and champagne
 extracts, and beat for 2 minutes more until frosting thickens.
Transfer frosting to a large pastry bag fitted with a 1/2-inch plain pastry tip or a gallon
 sized zip lock with a piping tip fitted in the corner. Leaving a 1/8-inch border on each
 cupcake, pipe a spiral of frosting into a 2-inch-high cone shape, using about 1/2 cup of
 frosting per cupcake. Transfer cupcakes to a baking sheet, and refrigerate while
 preparing the chocolate coating.
Prepare the chocolate coating: Combine chocolate and oil in a medium heat-proof bowl
 set over a medium saucepan of barely simmering water; stir until melted and smooth.
 Transfer to a small bowl, and let cool about 20 minutes. The choclate should be room
 temperature before dipping. It should NOT be very warm to the touch.
Holding each cupcake by its bottom, dip cupcake in the chocolate to coat frosting,
 allowing excess to drip off. Transfer to a baking sheet fitted with a wire rack. Spoon
 more coating around edge of cupcake and any exposed frosting; none of the frosting
 should show. Let cupcakes stand at room temperature 15 minutes. 
Refrigerate for 30 minutes to let coating set. Now with a DRY, clean paint brush brush
 the pearl dust onto the cooked dried white chocolate. Place back in refrigerator. You
 may decorate with gold cupcake wrappers that can be found at any craft store and
black satin ribbon.
Cover, and refrigerate for 2 hours more. Serve cold. Cupcakes can be refrigerated for up
 to 3 days.

original recipe adapted from {here}


Happy New Year Shine Readers!!!!!!

It's Hanna here from {bouffe e bambini} bringing you a little New Years Inspiration.


Pin It

Thursday, December 1, 2011

Homemade Red and Green Peppermint Patties

Homemade Red and Green Peppermint Patties

Hi Shine Readers!!!
It's Hanna from {bouffe e bambini} and today I am sharing an adorable, super festive Christmas recipe with you all.
This is me and I'm Super excited to be here!


Ingredients:
1 can sweetened Condensed milk
5-6 cups powdered sugar
1 tablespoon peppermint extract
3-5 cups semi sweet chocolate chips
2 tablespoons shortening

1 tablespoons red gel food coloring (you can buy this at any craft store but if you only have the kind you buy at the grocery, no worried use about half the little bottle)
1 tablespoon green gel food coloring (same as above)

Recipe:
1. divide the sweetened condensed milk into 2 bowls (about 1/2 cup each if your measuring)
2. add food coloring to each bowl, one red and one green.
3. Add 1/2 a tablespoon of peppermint extract to each bowl and mix.
4. slowly add the powdered sugar one cup at a time to each bowl. You will probably use about 3 cups per bowl. You want this mixture to be firm. You might have to use your hands to mix at the end. Beware it will be quiet sticky.
5. Once it is the right consistency, form little disks or balls. NOTE: because it can be quiet sticky coat your hands and the ball in powdered sugar while trying to form. Place on a wax paper covered baking sheet and put in the freezer
6. once really cold or frozen, microwave your chocolate chips and shorting in 30 second intervals as not to burn it stirring in between until smooth.
7. Take a fork, place the peppermint patty disk on top and dip. Place immediately on a wax paper cookie sheet. Once all are finished place in freezer to set.
8. You may pipe a little melted chocolate on top for decoration. Simple put a small amount of melted chocolate into a zip lock bag and cut a tiny little hole in the corner and pipe away.
ENJOY! MERRY CHRISTMAS!!!


A H*U*G*E Thank you to Ashley for featuring me today!!!! Happy Holidays!!!!


Pin It

*ps: don't forget to enter the big giveaway from me to you HERE!

Friday, November 18, 2011

Handmade Holiday: Clay Bird Ornaments

Okay, I've been SO excited for today for a couple of weeks! I'm so excited to see your linkups, and you're going to LOVE today's tutorial from Jessica Jane. You will honestly die over all of her creativeness; go see some of my favorites HERE. There's a surprise giveaway at the end of this post, and don't forget to add my link or button to the post you're linking up! xoxox
-------------------------------------------------------------------------
Hello Shine followers! I am going to share a tutorial of the most loved clay birds I like to make now and then. These make great gifts for family members, newlyweds, or Baby's 1st Christmas ornaments!


Bake according to clay package. (I typically bake for 15 minutes at 275 degrees.) After the clay has cooled from baking in the oven, paint it any which way you desire. I painted this one mustard yellow, coated it in white glitter, and hung a few charms from the loop at the bottom. The little vile has glitter inside of it. You can also just put the wire through the top portion of the bird, and have nothing dangling from below.

You can also make your bird plain, without words, and coat it in colored glitter. If you coat it in glitter, just put the glue or glaze on, and very quickly sprinkle glitter on it. You don't want the glaze to dry before the glitter gets to it.
I hope this tutorial made sense for the most part, if it didn't let me know if you have any questions!
A few of the past ornaments I have made for some ideas to anyone who wants to try the tutorial. Enjoy!

Amazing, right?!
Jessica has made a special one
for one of you to win:
{I'm really jealous! I want one for my tree!}
Win THIS ornament!
Photobucket

To Enter:
(You must follow my blog, and Leave a comment for each!)

1. Go thank Jessica HERE for her tutorial and giveaway!
2. For THREE entries, link up your handmade post, and be sure it either has my button or links back to handmade holidays
3. Pin any of my handmade holiday posts from this week on Pinterest
4. Follow me on Bloglovin' HERE
5. Enter THIS giveaway that ends tonight! Over $200 in prizes.
Giveaway ends Monday @midnight!

Link Up Your Handmade Goodies!

style="text-align: center;">

Thursday, November 17, 2011

Handmade Holiday:Cookie Pinwheels


Welcome to The Shine Project! Before you get to the awesome recipe below, I wanted to make sure that you know about our project, Threads. We employ at risk youth in American to make really amazing bracelets so they can pay their way through college. Thanks for your support and for helping us make a change. Excited to have you be a part of The Shine Project.
You can find the bracelets below and other products here 


------------------------------------------------------
Hi There!!!
I'm thrilled to be here guest blogging today for Ashley.

I'm Hanna from {bouffe e bambini}. I am a busy wife, mother of two and nurse. I absolutely L*O*V*E my blog and share tons of great recipes, some cute pics of my kiddos and some fashion posts. Please come by and see me anytime. I love new friends!!


Today I am going to share a great economical holiday gift idea, Red and White Sugar Cookie Pinwheels. They are stunning and sure to amaze anyone who is lucky enough to receive a few. They are also one of the most delicious cookies I've had the pleasure to taste.


Ingredients
  • 2 1/2 cups all-purpose flour
  • 1/2 teaspoon salt
  • 1/2 teaspoon baking powder
  • 1 cup unsalted butter, softened
  • 1 cup sugar
  • 1 egg
  • 1/2 teaspoon vanilla extract
  • 1 teaspoon peppermint extract
  • 1 tablespoon red food coloring.( I highly recommend the gel variety. You can buy it at any craft store. It is much brighter and you can use less)
  • Powdered sugar, for rolling out dough
  • 3 tablespoons milk

Directions

Sift together the flour, salt and baking powder and set aside.
Cream butter and sugar together in another large bowl. Add egg, vanilla, milk, and peppermint extract, and beat until incorporated. Gradually add the dry mixture, beating until combined. Remove half of the mixture from the bowl. Add red food coloring, beating until fully combined. You may have to knead the colored dough a bit to get it mixed thoroughly. On a sheet of waxed paper, roll out dough to form a large rectangle, about 1/4-inch thick. Repeat this step with the other half of uncolored dough with no food coloring.


Now very carefully, slide the red dough on top of the white dough and slide the parchment paper out. Trim edges if uneven and patch if necessary. Roll dough into a log, creating a swirl effect. NOTE: do not worry if the dough starts to tear a little when you are rolling it. This is normal. Simply mend it with your fingers as you go along.

Now place a generous amount of sprinkes in a shallow dish and roll the cookie dough log firmly over the sprinkles until they stick and its covered. Wrap tightly with saran wrap and place the dough back in the refrigerator and let chill for 2 hours.

Preheat oven to 375 degrees F.
Slice the dough into 1/2-inch slices and place on a parchment lined sheet tray about 1-inch apart. Bake fo2 10-15 minuets depending on how thick you sliced the cookies.

A cheap easy way to package these cookies is to buy a yard or two of muslin fabric, cut into a 12 inch circle, place cookies inside and tie with a bell, a little note, and some cute twine. I always use twine from {The Twinery}.

Happy Holidays Everyone!!!

Pin It

*I'm getting excited to see all of your handmade linkups on Friday!!!

Wednesday, November 16, 2011

Handmade Holiday: Wall Placard

Are you guys loving this handmade series as much as I am?! These women are so creative! Today, we have another handmade tutorial from my lovely friend Karly who blogs HERE.
She helped me SO much with the Shine Event, and made some big sacrifices to help out...
and it was the first time I had even met her...
Be sure to check out her sweet blog, and have fun with this Handmade gift idea!
--------------------------------------------------------------
Hello all you lovely readers of Ashley's equally lovely blog!
My name is Karly and I blog over HERE. As a Mom of three little girls currently living on barely one income, it is super important to know how to stretch your dollars, even when it comes to gifting during the Holidays. So today I am super thrilled to be sharing this project with you all, because it is so easy and inexpensive and fun...how could you not go try it out?

So here we go:
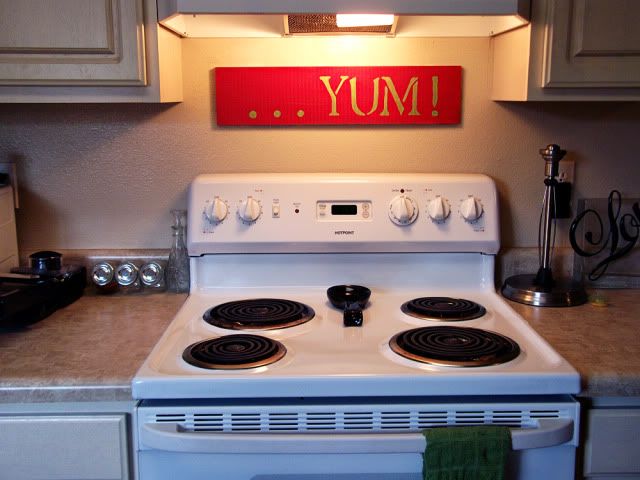
Today I'm sharing with you all how to make a fun painted wall placard on the cheap and easy.

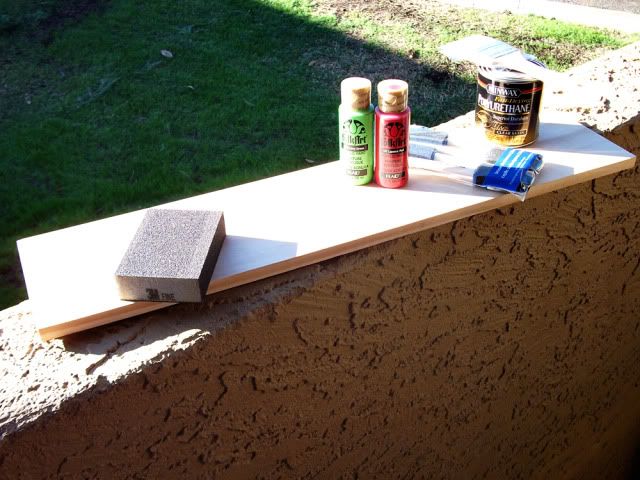
Let's start with what you'll need to complete this project!
Gather ye the following:
A piece of wood. Mine is .5inX5.5inX24in. Lowes $3.25

Acrylic paint. One bottle runs between $.97 and $1.25 at most stores, so a total of $2.00 spent.
Brushes. Sponge brushes usually run about $1.00 for a 4-pack.

Stencils. They run anywhere from $2.50 to $15.00. Mine were $4.00. Free printables are around if you Google it, or you can buy some nice printables HERE.

Sand Paper. I suggest super fine 220 sand paper, but if you'd like a more heavily distressed look, go for coarse. Lowes $2.50

Polyurethane (optional). I suggest using polyurethane to seal and finish the project, but it isn't totally necessary. With brush, $8.25.

Total spent: $20.00

The nice thing is that if you do multiple placards, the price decreases per piece so long as the other materials last (paint, etc.).

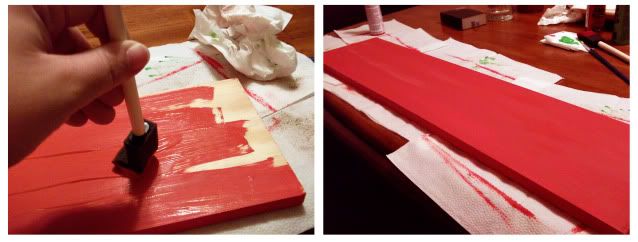
Prepare a work area by laying down some newspaper and place your board on it. Then slap on a nice coat of paint. You really only need one coat, because you want some of the wood grain to show just a little bit.

Let it dry completely, which takes about 15 minutes or so, depending on how thick you applied the paint. You can use a fan or blow dryer to speed up the process if you'd like.

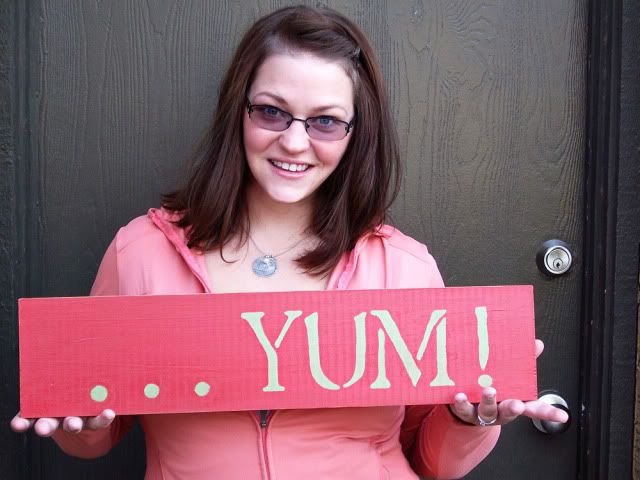
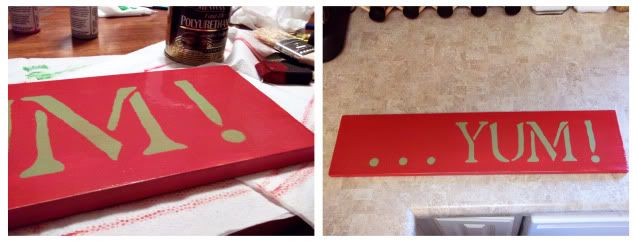
Next, figure out what you want to say on your placard. I chose ...YUM! because I'm putting mine in the kitchen above the stove. Super fun. Place your stencils and apply a light coat of paint. Once the paint dries, take your sandpaper and rough up the edges of the board to give it a little distressed, vintage look.

You don't have to do this, but I think it adds charm.

Now, I recommend using polyurethane if you are going to hang the piece somewhere where it can get dirty or somewhere with a lot of sun, because it will help seal the wood, make for easy cleaning and help prevent the paint from fading. Follow the directions on the can explicitly, in a WELL-VENTILATED area, because the fumes are rough. Do not use polyurethane if you are pregnant. Get someone else to do it for you, like a spouse or friend.

Apply a very light coat of polyurethane and allow to dry for at least 3-4 hours. It will look shiny and pretty. I like shiny and pretty. Once it is dry, use the super fine sand paper to gently sand down the polyurethane until it is nice and smooth. You can either leave it with one coat or apply more for a shinier, smoother look. I left mine with one because it gave it an interesting look once I finished sanding.


Hanging the placard can be very easy. I basically took a screw that was larger in width than the nail I planned on using in the wall and hammered it into the back of the wood, then pulled it out and popped it on the wall. No drilling required here!

And voila! You're done!


See, look, I'm super excited, just like you will be when you finish your project!


I hope you enjoyed my little tutorial and I hope it all made sense. If you have questions or comments, you can always ask, I promise I won't bite.

Happy Handmade Holidays, y'all!
(go say hey to karly HERE!)

*Don't forget to link up your handmade goodies back here on Friday!
And be sure to enter the giveaway worth over $200 HERE

Tuesday, November 15, 2011

Handmade Holiday: Photo Coasters

Hi Shine Project friends!
I am Lindsay, the girl behind the blog,


I am so excited to be a part of Ashley's Handmade Holiday Series!
I believe handmade gifts are the best of gifts because they come straight from the heart.

With that being said,
I want to share a fun DIY project with you.

One that will make the perfect gift idea for anyone on your list.

DIY Photo coaster project


Supplies:

4″x4″ tile coasters

white tissue paper
printer
scotch tape
scissors
Mod Podge (Matte or Gloss)
paint brush
Krylon acrylic clear coat
black felt with adhesive backing

Let’s get to work!

1. Print out a 4×6 photo onto white tissue paper.

To help the tissue feed thru your printer, Cut out an 8×10 piece of tissue paper and scotch tape it to a piece of 8×10 card stock.

2. Cut your tissue print down to 4″x4″

3. Brush a thin coat of Mod Podge over your tile and paste your photo onto the tile. Let dry COMPLETELY!

4. Once dry, put a thin coat of Mod Podge over your photo. Let dry completely.
Repeat 2 more times, making sure each coat is dry before you do another, or else the tissue will rip.

5. Once dry, seal with Kylon acrylic clear coat. I did 3 coats of this, making sure the previous coat is dry before you add another.

6. To complete the coaster, cut out a 4″x4″ piece of black felt. and attached it to the back.


7. Project Complete!

Wrap up 4 coasters with some ribbon or twine and you have a wonderful GIFT!

*I’ve done this project with gloss mod podge and matte mod podge.
Although completely different looks, both look fantastic.

.........

Thanks for crafting with me today!
I'd love it if you stopped by and said hello.


*Don't forget to get your handmade treasures ready to link up here on Friday!!!
See yesterday's project HERE,
and go check out Lindsey's creative blog!